Archive for the ‘Exercise 3: Switches’ Category
assignment3
In order to avoid ruining table or desk surfaces with an olfa or exacto knife, I created a switch that lights up an LED if it senses the blade is no longer in contact with the cutting mat. I did this by simply placing a sheet of aluminum foil under my cutting mat and attaching a wire to it and attaching another wire to my blade so that when the two came in contact, a light would start to blink, and I would know I was cutting on the wrong surface.
Arduino Sketch: 
Assignment 3 Switch
In studio my peers always steal my fruit from my desk. This pressure sensor will sense when pressure is lifted and then blink an led.
Arduino Sketch: sketch_090129a
Switch, Pot, Photosensor
I ran into a few roadblocks doing this one, which is why I’m posting a little late. It turns out that it’s much more difficult that one might imagine to get Processing to read serial data properly. As a result, all this does is make an LED blink (I wanted to have a few blink seperately, but I ran out of wire). The switch turns the whole thing on and off, the pot speeds up the blinking, and the photosensor changes the pattern of the blinking.
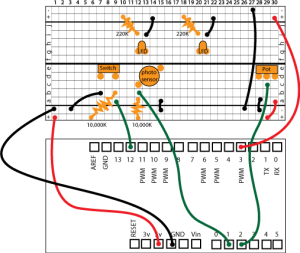
I also decided that I was tired of trying to remember exactly how I had wired things in the past and needed a better record. Schematics are great and all, but not terribly communicative for beginners such as myself, so I made a chart I can use to record the way in which I wire things. I’m posting, so you all can use it to if you want to. breadboard-template
Anyway, heres the vid:
Here’s my code:
Arduino Sketch: Exercise_3
And here’s my filled in chart showing how I wired it:
Gabriela Uribe- Assignment 3
Mercury switch:

Mercury Switch
It completes the circuit when the mercury touches the wires by tilting the capsule.
It is a simple switch made with the fastener of a manila folder. Two wires are tapes to the manila folder so that when the flaps are pushed down, they complete the circuit.
apologies for the delay.
Alex May – Assignment 3 Part 2
I created a pair of cardboard floormat switches. They are lined with foil on the inside and attached in a way very similar to the method used on the pushbutton switch demoed in class. By pressing the switches one after another the system can determine how many people have entered and left the room, keeping an accurate count of the number of people inside.
The code is as follows:
Home-made Mat Switch

Whenever someone steps onto this simple device, its inner circuit is completed and the device is switched “on”. Easy to make, although difficult to use (for example, once the thing is turned on, it won’t turn off until someone stomps on it, again).
On a separate note: supermarkets’ automatic doors (or indeed ANY automatic doors) use radar detectors and/or pressure mats to detect a passerby’s presence. They are, I believe, among the most common switches (I think they qualify as switches, no?).
— Christine
Rebecca Riggs- Scissors Switch
I made a switch using two wires and a pair of scissors. This switch counts how many cuts you are making indicated by the blinking LED.
Another switch is connect to this LED as well which can count down and take away the number of blinks. This system therefore also could be used to count how many people are going in and out of a room.
Arduino Sketch: <a title=”Arduino Sketch: switch” href=”http://code.arc.cmu.edu/~gregsaul/sketchDropBox/uploads/switch.pde” target=”_blank”>switch</a>
Interesting Switch
This is a switch I found that has application in automotive manufacturing, among other things I assume. It can be used to turn off dangerous processes that may continue to function after a collision, like the pumping of fuel to the engine of a car.
Drip Switch
This is a series of switches that I made to detect and count drops of liquid as they fill some vessel, in this case a shot glass, and to detect and signal that the vessel is full. Two wires, one connected to ground and another connected to 5 volts of power, were positioned over the opening of the glass about a millimeter apart. When water (with some salt in it) dripped from an inverted container above the glass, the drop of water closed the circuit between the two wires for a brief period of time which, had all gone according to plan, my arduino would have counted. Two more wires, also connected to ground and a separate 5 volt power supply, were positioned just below the inner rim of the shot glass. When the glass was filled, this circuit was closed, and a red LED blinked rapidly to signal that this was the case. Some programming kept me from counting the drops correctly, so I just made it blink every time a drop fell into the glass.
Drip Switch from Jim Toggweiler on Vimeo.
Code can be found as a comment on vimeo.
 Leave a comment

